To execute a SQL statement on your table, you set up a Statement object. So add this import line to the top of your code:
import java.sql.Statement;
In the try part of the try … catch block add the following
line (add it just below your Connection line):
Statement stmt = con.createStatement( );
Here, we're creating a Statement object called stmt. The Statement object
needs a Connection object, with the createStatment method. We also need a SQL Statement for the Statement object to execute. So add this line to your code:
String SQL = "SELECT * FROM Workers";
The above statement selects all the records from the database table called Workers.We can pass this SQL query to a method of the Statement object called executeQuery. The Statement object will then go to work gathering all the records that match our query.
However, the executeQuery method returns all the records in something called a ResultSet. Before we explain what these are, add the following import line to the top of your code:
import java.sql.ResultSet;
Now add this line just below your SQL String line:
ResultSet rs = stmt.executeQuery( SQL );
So our ResultSet object is called rs. This will hold all the records
from the database table. Before we go any further, though, here's an
explanation of what ResultSets are.
ResultSets in Java
A ResultSet is a way to store and manipulate the records returned from a SQL
query. ResultSets come in three different types. The type you use depends on
what you want to do with the data: - Do you
just want to move forward through the records, from beginning to end?
- Do you
want to move forward AND backward through the records, as well as
detecting any changes made to the records?
- Do you
want to move forward AND backward through the records, but are not
bothered about any changes made to the records?

The ResultSet type goes between the round brackets of createStement:
Statement stmt = con.createStatement( );
Because we've left the round brackets empty, we'll get the default
RecordSet, which is TYPE_FORWARD_ONLY. In the next section, we'll use one of
the other types. But you use them like this:
Statement stmt =
con.createStatement( RecordSet.TYPE_SCROLL_SENSITIVE );
So you first type the word RecordSet. After a dot, you add the RecordSet
type you want to use.However, it doesn't end there. If you want to use TYPE_SCROLL_SENSITIVE or TYPE_SCROLL_INSENSITIVE you also need to specify whether the ResultSet is Read Only or whether it is Updatable. You do this with two built-in constants: CONCUR_READ_ONLY and CONCUR_UPDATABLE. Again, these come after the word RecordSet:
ResultSet.CONCUR_READ_ONLY
ResultSet.CONCUR_UPDATABLE
This leads to a rather long line of code:ResultSet.CONCUR_UPDATABLE
Statement stmt =
con.createStatement( RecordSet.TYPE_SCROLL_SENSITIVE,
ResultSet.CONCUR_UPDATABLE);
One more thing to get used to with ResultSets is something called a Cursor.
A Cursor is really just a pointer to a table row. When you first load the
records into a ResultSet, the Cursor is pointing to just before the first row
in the table. You then use methods to manipulate the Cursor. But the idea is to
identify a particular row in your table.
Using a ResultSet
Once you have all the records in a Results set, there are methods you can
use to manipulate your records. Here are the methods you'll use most often:We set up the ID column to hold Integer values. The method you use to get at integer values in a column is getInt:
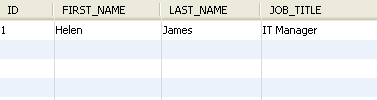
int id_col = rs.getInt("ID");
Here, we've set up an integer variable called id_col. We then use the
getInt method of our ResultSet object, which is called rs. In
between the round brackets, we have the name of the column. We could use the
Index number instead:
int id_col = rs.getInt(1);
Notice that the Index number doesn't have quote marks, but the name does.For the other three columns in our database table, we set them up to hold Strings. We, therefore, need the getString method:
String first_name =
rs.getString("First_Name");
Or we could use the Index number:
String first_name = rs.getString(2);
Because the ResultSet Cursor is pointing to just before the first record
when the data is loaded, we need to use the next method to move to the first
row. The following code will get the first record from the table:
rs.next( );
int id_col = rs.getInt("ID");
String first_name = rs.getString("First_Name");
String last_name = rs.getString("Last_Name");
String job = rs.getString("Job_Title");
Notice that rs.next comes first in this code. This will move the
Cursor to the first record in the table.int id_col = rs.getInt("ID");
String first_name = rs.getString("First_Name");
String last_name = rs.getString("Last_Name");
String job = rs.getString("Job_Title");
You can add a print line to your code to display the record in the Output window:
System.out.println( id_col + " " + first_name
+ " " + last_name + " " + job );
Here's what your code should look like now (we've adapted the print line
because it's a bit too long):
If you want to go through all the records in the table, you can use a loop. Because the next method returns true or false, you can use it as the condition for a while loop:
while ( rs.next( ) ) {
}
In between the round brackets of while we have rs.next. This
will be true as long as the Cursor hasn't gone past the last record in the
table. If it has, rs.next will return a value of false, and the while loop will
end. Using rs.next like this will also move the Cursor along one record at a
time. Here's the same code as above, but using a while loop instead. Change
your code to match:
When you run the above code, the Output window should display the following:

Now that you have an idea of how to connect to a database table and display records we'll move on and write a more complex programme using forms and buttons to scroll through the records.